

Every exchange has special features to attract traders. Coinbase Pro has a special code helping to automate and simplify the trading. This code is the Coinbase Pro API.
It is absolutely free to create an account, as well as enable the Coinbase Pro API.
Coinbase and Coinbase Pro Differences
The two platforms do have something in common. At least Coinbase Global Inc owns both and the UIs resemble each other.
Yet, it is obvious that Coinbase and Coinbase Pro share quite a few differences. Coinbase is rather a cryptocurrency marketplace, whereas Coinbase Pro is a full-fledged crypto exchange. Coinbase resembles a cryptocurrency wallet, whereas Coinbase Pro is more likely a trading platform.
Innovative attributes and endpoints make trading on Coinbase Pro API much faster and better than on Coinbase.
Now Coinbase Pro API is available for more than 100 countries.
Pros and Cons of Using Coinbase Pro API
Here’s a short list of pros and cons traders should take into account.
Pros:
● Simple
● Intuitive
● Fully regulated in the US
● High liquidity
● Supports fiat (USD, EUR, GBP)
● Supports over 120 cryptocurrencies
Cons:
● High fees
● Slow customer support
● Too complicated for newbies
To sum up, Coinbase Pro API has twice as many pros rather than cons.
Does Coinbase Pro Take Fees?
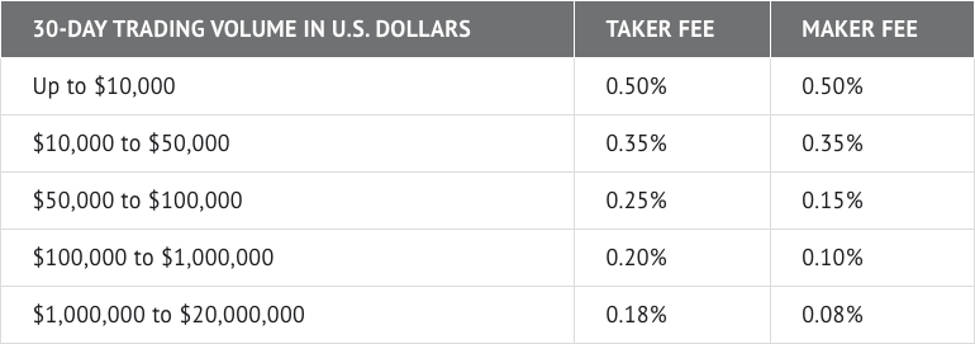
Yes, it does. Coinbase Pro takes the usual trading fees from its users. It happens after a 30-day period when the final price is calculated. For the trader’s convenience, the sum is taken in USD.
As usually, fees are divided into “maker” and “taker”:
1. A user becomes a taker when a placed market order gets filled immediately. Fee: from 0.04% up to 0.50%.
2. Aser becomes a maker when a placed order is not filled at once and goes on the order book. So there’s a need to wait until it gets matched by another trader. Fee: 0.00% up to 0.50%.
3. And when the order gets filled only partially, both fees are paid. At first, a taker fee matching the filled portion is paid, while the rest of the order moves on the order book till later. And when it is matched, a maker fee is paid.
This table shows the current trading volume for both fees:
Do Other Exchanges Have an API?
Many other exchanges do have an API. That's why Coinbase Pro API can’t be the only choice for traders. Here are just several exchanges with API:
● Binance
● BitMex
● HitBTC
● Kraken
● Gemini
● KuCoin
● Bittrex
● Bitfinex
After completing proper research, traders can choose among those exchanges provided or find some other platforms which would meet their needs. However, let's get back to Coinbase Pro.
Creating an Account on Coinbase Pro
Traders have only two methods of creating an account on this platform:
1. If a trader already has a Coinbase account, the only thing left is to connect it with Coinbase Pro. Then funds transfer would be possible between the accounts.
2. Or just visit the Coinbase Pro start page and launch an account right there.

Having clicked the “Get started” button, newcomers have to fill up their basic account details, verify an email address and enable two-factor authentication. To complete the registration, users have to provide some personal information: name, date of birth, address, intent, source of funds, occupation, including an ID photo and a link to a bank account.
What is a Coinbase API Key?
To deal with a Coinbase Pro API, traders require a Coinbase API key. First of all, click on the “API” and then on the “+ New API Key” button. Then users have to choose permissions for the API Key, set the nickname and a passphrase, an extra level of authentication and a security feature realized by Coinbase.
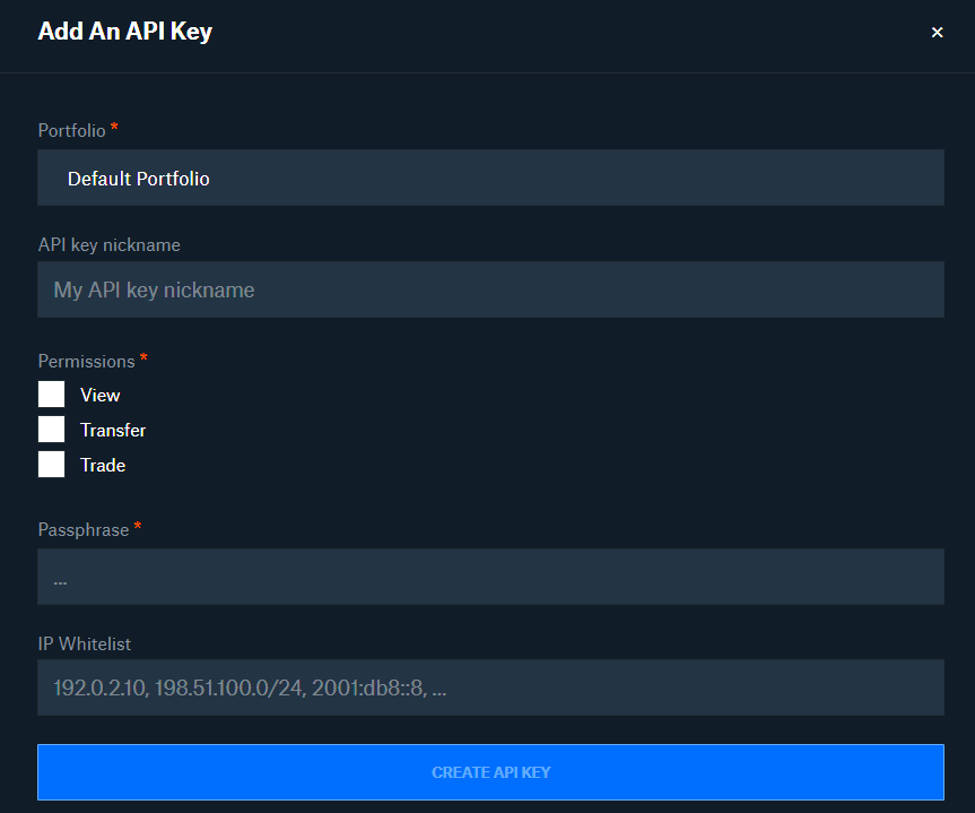
Before the API Key could start working, traders need to complete one more step: enter a verification code to get a secret key. Moreover, users should keep that secret key in a safe place so as not to lose it.
Finally, the Coinbase Pro API is created. Let’s move on and talk about its abilities.
Useful Python Coinbase Pro API Commands
Each trader can choose their favorite client out of five supported:
Python is the most popular client for writing commands on Coinbase Pro API. That’s why examples would consist only of it.
Let’s begin:
pip install cbpro
Trading Pairs Info With Python Coinbase API
In the Coinbase Pro API python library uses get_products endpoint to get the information on Trading Pairs. Next step is importing the library, initializing the client, obtaining products data:
import cbproimport pandas as pdc = cbpro.PublicClient()data = pd.DataFrame(c.get_products())data.tail().
Price Data With Python Coinbase API
To get the information on Price Data, use get_product_ticker endpoint and specify the ticker parameter. For Cardano it would be:
ticker = c.get_product_ticker(product_id='ADA-USD')ticker
The second way to obtain the date is with the help of Coinbase Pro REST API endpoints:
import requests ticker = requests.get('https://api.pro.coinbase.com/products/ADA-USD/ticker').json()ticker
Historical Data With Python Coinbase API
To get the information on Historical Data, use get_product_historic_rates endpoint. It is possible to specify the granularity, start and end date.
Look how simple is obtaining ETH-USD historical data with the default parameters and arranging it all into an orderly data frame:
historical = pd.DataFrame(c.get_product_historic_rates(product_id='ETH-USD')) historical.columns= ["Date","Open","High","Low","Close","Volume"]historical['Date'] = pd.to_datetime(historical['Date'], unit='s')historical.set_index('Date', inplace=True)historical.sort_values(by='Date', ascending=True, inplace=True)historical
If needed, later this data could be used to create a simple indicator and produce a candlestick chart.
Accessing Technical Indicators With Python Coinbase API
Unfortunately, Coinbase Pro API doesn’t offer any preset indicators. However, it’s possible to make them using in-built pandas features or just relying on the btalib library.
That’s how to create a simple 20 SMA indicator with pandas:
historical['20 SMA'] = historical.Close.rolling(20).mean()historical.tail()
And having all these data, it’s possible to create an interactive chart:
import plotly.graph_objects as gofig = go.Figure(data=[go.Candlestick(x = historical.index,open = historical['Open'],high = historical['High'],low = historical['Low'],close = historical['Close'], ),go.Scatter(x=historical.index, y=historical['20 SMA'], line=dict(color='purple', width=1))])fig.show()
Order Book Data
To reach the Order Book data, use the get_product_order_book Coinbase Pro API endpoint. Here’s an example of obtaining data for BTC-USD and arranging the bids and asks.
order_book = c.get_product_order_book('BTC-USD')order_book
Next step is creating the two data frames:
bids = pd.DataFrame(order_book['bids'])asks = pd.DataFrame(order_book['asks'])bids.head()
Now merging them and rename the columns to be more informative:
df = pd.merge(bids, asks, left_index=True, right_index=True)df = df.rename({"0_x":"Bid Price","1_x":"Bid Size", "2_x":"Bid Amount","0_y":"Ask Price","1_y":"Ask Size", "2_y":"Ask Amount"}, axis='columns')df.head()
Trades Data
To obtain the Trades Data, use the get_product_trades endpoint. Don’t forget to enter the asset obtaining the data on; ETH-USD in this example.
trades = pd.DataFrame(requests.get('https://api.pro.coinbase.com/products/ETH-USD/trades').json())trades.tail()
Not to get the Python library stuck, use the REST API.
How to use Coinbase Pro WebSocket API?
To access Coinbase Pro WebSockets use the WebscoketClient endpoint. Thanks to it, traders can easily stay updated on the interesting data.
import cbprowsc = cbpro.WebsocketClient(url="wss://ws-feed.pro.coinbase.com", products="ADA-USD",channels=["ticker"])
To close the WebSocket, just use a simple command:
wsc.close()
The next command helps to collect the ticker price data up to a certain number of WebSocket messages and print them out:
import time, cbproclass myWebsocketClient(cbpro.WebsocketClient):def on_open(self):self.url = "wss://ws-feed.pro.coinbase.com/"self.products = ["ETH-USDT"]self.channels=["ticker"]self.message_count = 0def on_message(self, msg):self.message_count += 1if 'price' in msg and 'type' in msg:print ("Message type:", msg["type"],"\t@ {:.3f}".format(float(msg["price"])))def on_close(self):print("Closing")wsClient = myWebsocketClient()wsClient.start()print(wsClient.url, wsClient.products, wsClient.channels)while (wsClient.message_count < 50):print ("\nmessage_count =", "{} \n".format(wsClient.message_count))time.sleep(1)wsClient.close()
Executing Trades on Coinbase Pro API
With the python Coinbase API commands, it is quite simple to execute trades. Let’s have a look at two examples: executing a trade on ETH when BTC hits a certain price and executing an ETH trade when BTC moves 5% in the last 5 minutes.
How to Execute a Trade on ETH When BTC Hits a Certain Price?
Now let’s find out how to properly launch an order with specified requirements: begin a trade on ETH when BTC hits a certain price (e.g. $38500).
1. Set an order foundation;
2. Create a loop that will check whether the price level is hit or not;
3. Once the price is hit, a market order will be executed;
4. Wait for a few seconds and check if the order has been really filled.
After setting the logic, it’s time to import the relevant libraries and set up the APIs:
import cbproimport base64import json from timeimport sleepkey = ''secret = ''passphrase = ''encoded = json.dumps(secret).encode()b64secret = base64.b64encode(encoded)auth_client = cbpro.AuthenticatedClient(key=key, b64secret=secret, passphrase=passphrase)c = cbpro.PublicClient()
As for the main trading logic, here’s an important notice to make the order safer. To do so, place a limit order by taking the current ETH-USD price and adding a few dollars on the top.
while True:try:ticker = c.get_product_ticker(product_id='BTC-USD')except Exception as e:print(f'Error obtaining ticker data: {e}')if float(ticker['price']) >= 38500.00:try:limit = c.get_product_ticker(product_id='ETH-USD')except Exception as e:print(f'Error obtaining ticker data: {e}')try:order=auth_client.place_limit_order(product_id='ETH-USDT',side='buy',price=float(limit['price'])+2,size='0.007')except Exception as e:print(f'Error placing order: {e}')sleep(2)try:check = order['id']check_order = auth_client.get_order(order_id=check)except Exception as e:print(f'Unable to check order. It might be rejected. {e}')if check_order['status'] == 'done':print('Order placed successfully')print(check_order)breakelse:print('Order was not matched')breakelse:print(f'The requirement is not reached. The ticker price is at {ticker["price"]}')sleep(10)
How to execute an ETH trade when BTC moves 5% in the last 5 minutes?
The task gets slightly complicated. The new loop will have to get the prices of the two cryptocurrencies and calculate the percentage change in between:
● If the percentage change is less than 5%, the program will be sleeping for 5 more minutes;
● If the percentage change is equal to or more than 5%, the trade will execute.
Wait for a few seconds after the accomplishment, and check on the trade again.
while True:try:ticker_old = c.get_product_ticker(product_id='BTC-USD')except Exception as e:print(f'Error obtaining ticker data: {e}')sleep(300)try:ticker_new = c.get_product_ticker(product_id='BTC-USD')except Exception as e:print(f'Error obtaining ticker data: {e}')percent = ((float(ticker_new['price']) - float(ticker_old['price']))*100)/float(ticker_old['price'])if percent >= 5:try:limit = c.get_product_ticker(product_id='ETH-USDT')except Exception as e:print(f'Error obtaining ticker data: {e}')try:order=auth_client.place_limit_order(product_id='ETH-USDT',side='buy',price=float(limit['price'])+2,size='0.007')except Exception as e:print(f'Error placing order: {e}')sleep(2)try:check = order['id']check_order = auth_client.get_order(order_id=check)except Exception as e:print(f'Unable to check order. It might be rejected. {e}')if check_order['status'] == 'done':print('Order placed successfully')print(check_order)breakelse:print('Order was not matched')breakelse:print(f'The requirement is not reached. The percent change is at {percent}')
How to cancel orders with Coinbase Pro API?
It is very simple to cancel an order. Go to the cancel_order API endpoint and enter the order id as a parameter:
client.cancel_order(order_id = "ORDER-ID-HERE")
Conclusion
In this article, we took a closer look at Coinbase Pro API and gave a few python code examples. The full code may be found on the platform’s GitHub page.